Manual configuration of neen.mail - ADVANCED MAIL - English
Indice |
Introduction
neen.mail, neen's professional e-mail solution, is a service that delivers high levels of added value and has what it takes to provide quality and security in personal and corporate communications, eliminating the problems of viruses and spam. You can view your neen.mail mailbox in either of the following two ways:
View via webmail
You can read the e-mails you have received in your neen.mail inbox by choosing from 3 different webmail solutions (i.e. without downloading the e-mails onto your computer):
- Atmail (RECOMMENDED): a platform complete with Groupware, Calendaring and Push mail support for staff and partners.
- Horde: Webmail with Groupware, contacts and shared calendar.
- RoundCube: Webmail with simplified functionality. To access webmail, visit http://webmail.neen.it, click on the webmail program you prefer and then enter your username and password.
Username: your username is your e-mail address, e.g. info@neen.it
Password: the password associated with your e-mail address.
Viewing e-mails on your own e-mail client
You can configure your e-mail account on your own computer.
This manual has been drafted to help you configure the neen.mail mailbox on the e-mail client that you habitually use.
Before getting started, we recommend that you print and store the details required for configuration, which you should have received by e-mail.
You can configure your e-mail account in two different ways: pop3 and IMAP.
What is the difference between pop3 and IMAP?
Both protocols allow a client to access, read and delete e-mails from a server, but there are a few differences between the two protocols.
With both protocols, the client downloads the e-mails directly onto the computer, either deleting them from the server in the process or retaining copies of the e-mails on the server, allowing them to be downloaded later onto other computers.
Here is a list of the characteristics of IMAP (which are not the same as those of POP3):
- Access to e-mails both online and offline With POP3, the client connects to download the new messages and then disconnects. With IMAP, the client stays connected and responds to the requests that the user makes via the interface – this makes it possible to save time if there are large messages.
- Multiple users can use the same mailbox The POP protocol assumes that a single client (user) is connected to a given mailbox (i.e. to the mailbox assigned to that user). In contrast, IMAP allows for simultaneous connections to the same mailbox, providing mechanisms to monitor the changes made by each user.
- Support for the accessing of the individual MIME parts of a message Most e-mails are sent in MIME format, which allows the message to have a tree structure in which each branch represents different content (headers, attachments or parts thereof, message in a given format, etc.). The IMAP protocol makes it possible to download a single MIME part or even sections of the parts, to give a preview of the message or to download a mail without its attached files.
- Support for attributes of the messages stored on the server Through the use of attributes, stored on the server and defined using the IMAP4 protocol, each client can track each message, in order to find out, for example, if it has been read or replied to.
- Access to multiple mailboxes on the server With the IMAP4 protocol, certain users can create, modify or delete mailboxes (normally associated with folders) on the server. In addition, this form of mailbox management makes it possible to have folders that are shared among different users.
- Option to conduct searches on the server IMAP4 makes it possible for the client to submit requests to the server about which messages meet given criteria in order, for example, to conduct searches on messages without having to download them all.
- Support for a mechanism for the definition of extensions IMAP is mainly used in large networks like those of major companies or universities, where users often hot-desk: with POP3, it would be necessary to download the messages every time you changed PC, whereas with IMAP you can choose to download only the new messages or access a specific message without having to download the others.
Details required for configuration
USERNAME: same as the e-mail address
PASSWORD POP3: pop.neen.it
SMTP: smtp.neen.it
IMAP: imap.neen.it
WEBMAIL: http://webmail.neen.it
Configuration on Microsoft Outlook - in POP3 mode
1. Open Microsoft Outlook, click on Tools and select E-mail account 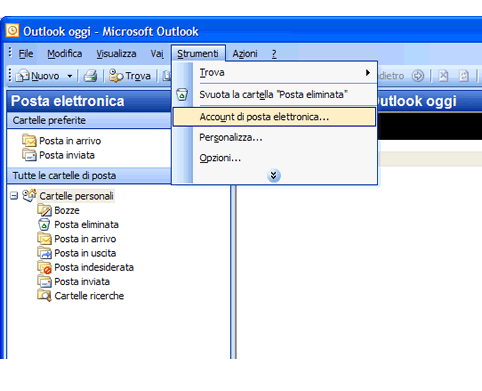
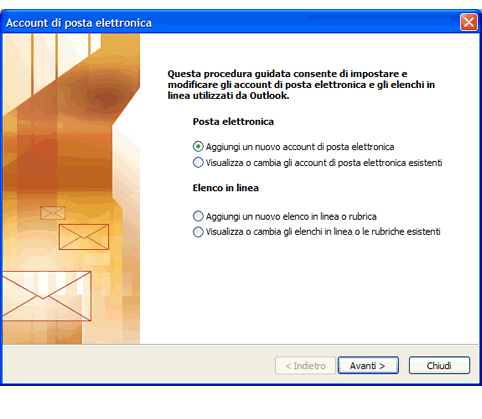
2. In the E-mail account window, select Add a new e-mail account and click Next
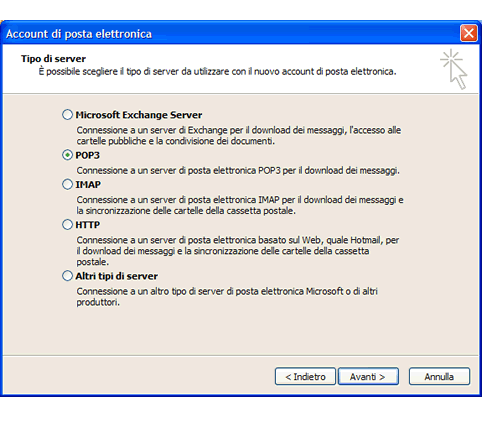
3. The Server type window opens. Select POP3 to download the messages onto your computer and click Next
4. You are in Internet e-mail settings (POP3)
• In User information enter your first name and surname in the form in which you want them to be displayed in the sender field
• In E-mail address enter your e-mail address
• In Server information enter pop.neen.it as the incoming mail server (POP3) and smtp.neen.it as the outgoing mail server (SMTP)
• In Access information enter the Username and Password. Check the Save password option
• Click on Other settings. 
5. Click the General tab; enter the name that you want to give to the account and your neen.mail address
6. Click the Outgoing mail server tab, check The outgoing mail server (SMTP) requires authentication box and then choose the option Use the same settings as the incoming mail server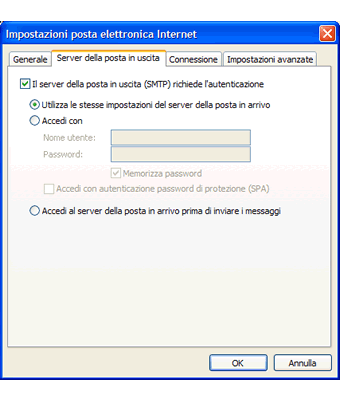
7. Click Ok and then Finish
The configuration is complete.
Configuration on Microsoft Outlook Express - In POP3 mode
1. Open Microsoft Outlook Express, click on Tools and select Account 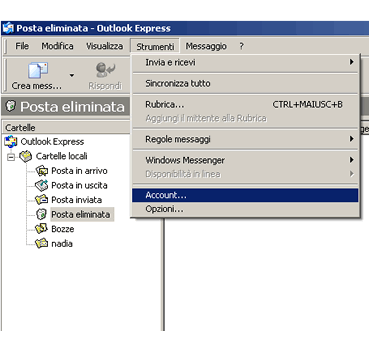
2. In Internet account, click Add and then E-mail. Click Next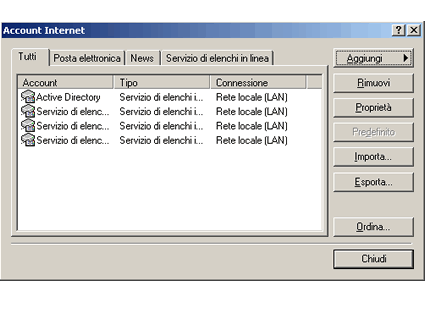
3. In Username enter the name in the form in which you want it to be displayed in the sender field and click Next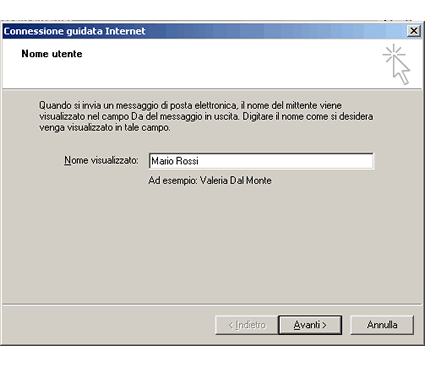
4. In E-mail address enter your neen.mail address and click Next

5. In E-mail server names choose POP3 and enter pop.neen.it as the Incoming mail server (POP3) and smtp.neen.it as the Outgoing mail server (SMTP). Now click Next

6. In E-mail access enter your neen.mail address in the Account Name field and your Password. Click Next and then Finish
7. Now select the address you have created, choose Properties, click the Server tab and check the Server authentication required box. Click on Settings, select Use the same settings as the incoming mail server and click Ok
8. Click Apply and then Ok
The configuration is complete.
Configuration on Apple Mail - In POP3 mode
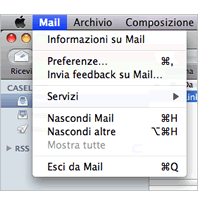
1. Open Apple Mail, and from the Mail menu select Mail, then Preferences
2. In the Account window, click “+” at the lower left to add your neen.mail account. The Add account window will open
* In Full name enter your first name and surname as you want them to appear in the sender field
* In E-mail address enter your e-mail address
* In Password enter your e-mail password
* Click Continue
3. You are in the Incoming mail server window, from the drop-down menu choose POP to download the messages onto your computer
* In Description enter your neen.mail address
* In Incoming mail server (POP3) enter pop.neen.it
* In Username enter your username (your neen.mail address)
* In Password enter your e-mail password
* Click Continue
4. You are in the Outgoing mail server window
* In Description enter your neen.mail address
* In Outgoing mail server (SMTP) enter smtp.neen.it and check the Use authentication box
* In Username enter your username (your neen.mail address)
* In Password enter your e-mail password
* Click Continue 
5. You are in the Account summary window, where you will see all of the details that you have entered. Check that they are right and then click Create
6. Click General and select Save
The configuration is complete.
Configuration on Mozilla Thunderbird - In POP3 mode
1. Open Thunderbird
2. Click Tools, Account settings and Add mail account 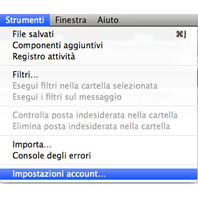
3. Fill out the following fields:
* In Full name enter your first name and surname as you want them to be displayed in the sender field
* In E-mail address enter your neen.mail address
* In Password enter your e-mail password
* Click Continue
4. Thunderbird will try to set up the server configuration automatically. Check that the details provided are correct. Click Create an account
5. A window opens that summarises all the information that has been entered. Check that the following are correct:
* E-mail address
* Server settings
* Outgoing server (SMTP)
* Click Ok
The configuration is complete.
Configuration on iPhone
1. Select the Settings icon, then select Mail, contacts, calendars
2. Select Add account....
* In the list of possible account types (Gmail, Yahoo!, etc.), select Other
* Select Add mail account


3. Enter the requested information: Name, Address, Password, Description, then select Next
4. Select one of the desired reception protocols (IMAP or POP) and enter the requested information.
To learn more about the difference between the two protocols, see the section entitled Difference between pop and IMAP
- If you have selected POP, in Incoming mail server enter:
* Host name: pop.neen.it
* Username: your e-mail address
* Password: the password associated with the e-mail address
- If you have selected IMAP, in Incoming mail server enter:
* Host name: imap.neen.it
* Username: your e-mail address
* Password: the password associated with the e-mail address
In Outgoing mail server enter:
* Host name: smtp.neen.it
* Username: your e-mail address
* Password: the password associated with the e-mail address
5. By default, the iPhone Mail application will attempt to connect to the server using SSL.
Should it fail because the account you are registering does not use SSL, the following message will be displayed:"Cannot connect using SSL. Do you want to try to configure the account without SSL?".
Answer Yes.
At this point the configuration is complete and so you can save it.
Configuration on iPAD
1. Select the Settings icon, then select Mail, contacts, calendars
File:Ipad 1.png
2. Select Add account....
* In the list of possible account types (Gmail, Yahoo!, etc.), select Other
File:Ipad 2.pngFile:Ipad 3.png
3. Enter the requested information: Name, Address, Password, Description, then select Next
File:Ipad 4.png
4. Select one of the desired reception protocols (IMAP or POP) and enter the requested information.
To learn more about the difference between the two protocols, see the section entitled difference between pop and IMAP
- If you have selected POP, in Incoming mail server enter:
* Host name: pop.neen.it
* Username: your e-mail address
* Password: the password associated with the e-mail address
- If you have selected IMAP, in Incoming mail server enter:
* Host name: imap.neen.it
* Username: your e-mail address
* Password: the password associated with the e-mail address
File:Ipad 5.png
In Outgoing mail server enter:
* Host name: smtp.neen.it
* Username: your e-mail address
* Password: the password associated with the e-mail address
5. By default, the iPad Mail application will attempt to connect to the server using SSL.
Should it fail because the account you are registering does not use SSL, the following message will be displayed:"Cannot connect using SSL. Do you want to try to configure the account without SSL?".
At this point the configuration is complete and so you can save it.
